Showing posts with label Landscaping. Show all posts

Monday, July 3, 2017

Backyard Secrets Revealed


Our backyard has a secret world. 


I’m so excited about this part of our yard. And I’m so excited to show you it!
In fact I made a video to walk you around and let you experience it, since photos don’t really convey it as well.
If you remember, last August I walked you around our very different backyard, for a video tour. I HIGHLY recommend going back to watch those! (There are actually two. One after the deck, and one after the dig.) The difference is outrageous! I forgot how bad it used to be. It hurt to look back and see it again. Yikes! (Man that was a lot of work!... Mainly done by Blake!)
In the old videos you also get to hear some of my plans being talked out in the videos, some came to be, some did not.

But here is our yard today! 
In the video you get to see the whole yard, but the extra fun is seeing our hidden world, and how to get to it.


Now for some stills that I’ll type you through. (But the video is better for this.)


So see these evergreens?

I always felt like they were special, because they really add some magic to the yard. They make it feel much more private and nature-y than our yard would otherwise feel in a neighborhood with houses around.
So I was always fond of them. But this spring I went on a landscape cleanup spree and I cleaned out all the dead branches that were back in those evergreens.

Blake was out of town on a work trip... and what happens when you leave me alone with my imagination? I create worlds. 
After the trees were free of the endless pokey leafless branches, there was suddenly 4 distinct nooks back in these trees.

The kids already went back there sometimes. And it was a cool novelty, which we called the hideout or hideaway. But there wasn’t much to do but walk back there. 
However once it was cleared out, and I walked it over and over carrying the branches, I started seeing (and smelling the fresh earthy piney scent of) a fairy land.

Before you know it I had gone "Pinterest shopping", applied my hopes and dreams and constraints, and had drawn up plans. Blake came home to a very excited Lydia, who had some strong hopes for this yard.

(It should be noted, that right before he left he worked really hard to get our two side fences back into place so that we could play in the backyard with out Bronny constantly trying to run away. And so even without the fairy land ideas, the back yard was suddenly a very magic place to be.)

Well Blake being the amazing person that he is, just jumped right on board with me and turned my imaginations into reality.

He used pressure treated lumber and an old free pallet he found to create an “outdoor kitchen” (which is just a countertop and some muffin pans.)

 And a forest house. 
 We used every last inch of our biggest nook’s freespace by building around the branches that were left.

I used some of our Minwax stain in Walnut (that we have leftovers from our failed attempt to stain our floors.) And just rubbed the stain on. I wasn’t sure you could stain treated lumber but it worked fine for me!
Having the lumber stained darker makes it:
1) More magical, because the wood feels as old as time, like fairies built this and abandoned it.
2) Prettier because treated lumber isn’t pretty.
3) Invisible from the outside of the evergreens because it matches the bark and camouflages everything away.


Jasmine REALLY wanted a lantern for her house. And I found this one at Big Lots. The white part is plastic, but there is still glass in the windows. So far they have been very careful with it and I feel totally ok with them having it out there.

It turned out so cute. 
The kids love it.
And it’s so fun surprising our friends when they come over and discover a whole new world they never saw coming.

There are a couple more nooks I want to fill. I was hoping to find a big stump for a table and a couple small stumps for chairs. 
And maybe trying to make some kind of music area -- where there are wind chimes or something like that to play with. 

But for now we are all so happy with how our yard turned out.

It’s SO fun to add this bit of magic and LOADS of imagination.


Hope you guys enjoyed the tour!
I had a lot of fun showing you.


Wednesday, June 28, 2017

Raised Garden Beds

Alright, so let’s talk about these garden beds.
This is a post for those of you who like to hear my brain tick away. 
These beds took A LOT of round and round and round, both in planning and executing.

You know me, I think very hard about things. And you’ve probably also picked up on me really wanting to get things right.

This is the story of all that inside this garden. It came out good, but the journey was bumpy.


We have a nice sized yard, but it’s not huge. And I didn’t want it to start feeling cramped and I wanted it to have lots of running space for the kids. So I really wanted to plan it right -- both in form and function.

When starting this gardening idea...I came up with about 14 different complete plans, at least, for how to get one in our yard and ruled them out for one reason or another.

I thought about wood raised beds (a lot) but they weren’t cheap, and they would have rot issues over time. And I didn’t feel great about using treated lumber for food growing, so I ruled that out.

For a couple unsupervised days I thought about making concrete beds. But when Blake came back into town, after that work trip, he told me that was not structurally sound. That was was a bummer because I was excited about that look.

After a lot of back and forth, I went with the galvanized stock tank option. It was cheaper than some lumber options (SOOOO MUCH cheaper than cedar!) and it was much more durable.

Now I had to really strain here for the visual. Pinterest has many depiction's of these tanks as gardens, but no one had really gone and painted them. (I found a couple but they were random -- like bronze, which didn’t help me “see” mine.) But it was pretty much just natural-silver visuals. 
Which is super cute in the right spot. But for my backyard it felt like a misstep to me. I just thought our house is more formal, and less farmy and I couldn’t find the line to ride to get that to connect together here.

I saw a couple bathtubs on Pinterest that were stock tanks painted and that was really the only thing I had to prove I wasn’t doing something ugly to myself. But those were smooth in the center, without the ridges mine have. And of course, I have to love the smooth ones a lot, because there is no easy way for me to get those to my house. So I was trying to convince myself these would work. It was kinda tense for me inside. Because this wasn’t a thift-store-makeover-price-tag, so I didn’t want to mess it up.

But we went for it. It really was the most rational option for us.

The other thing I thought way too hard about WHERE to put these.
My first thought had nothing to do with where they ended up. My first concept was to get a much longer single tank and have it parallel to the fence. The thinking being it would leave the yard more open and free for playing.

I spent about a week drawing that on paper, staring out the window squinting it into existence, walking the space, measuring the space, drawing it again. And I couldn’t get it to feel right. After enough of this, I also realized that, that location didn’t get a full day of sun, which most produce wants.

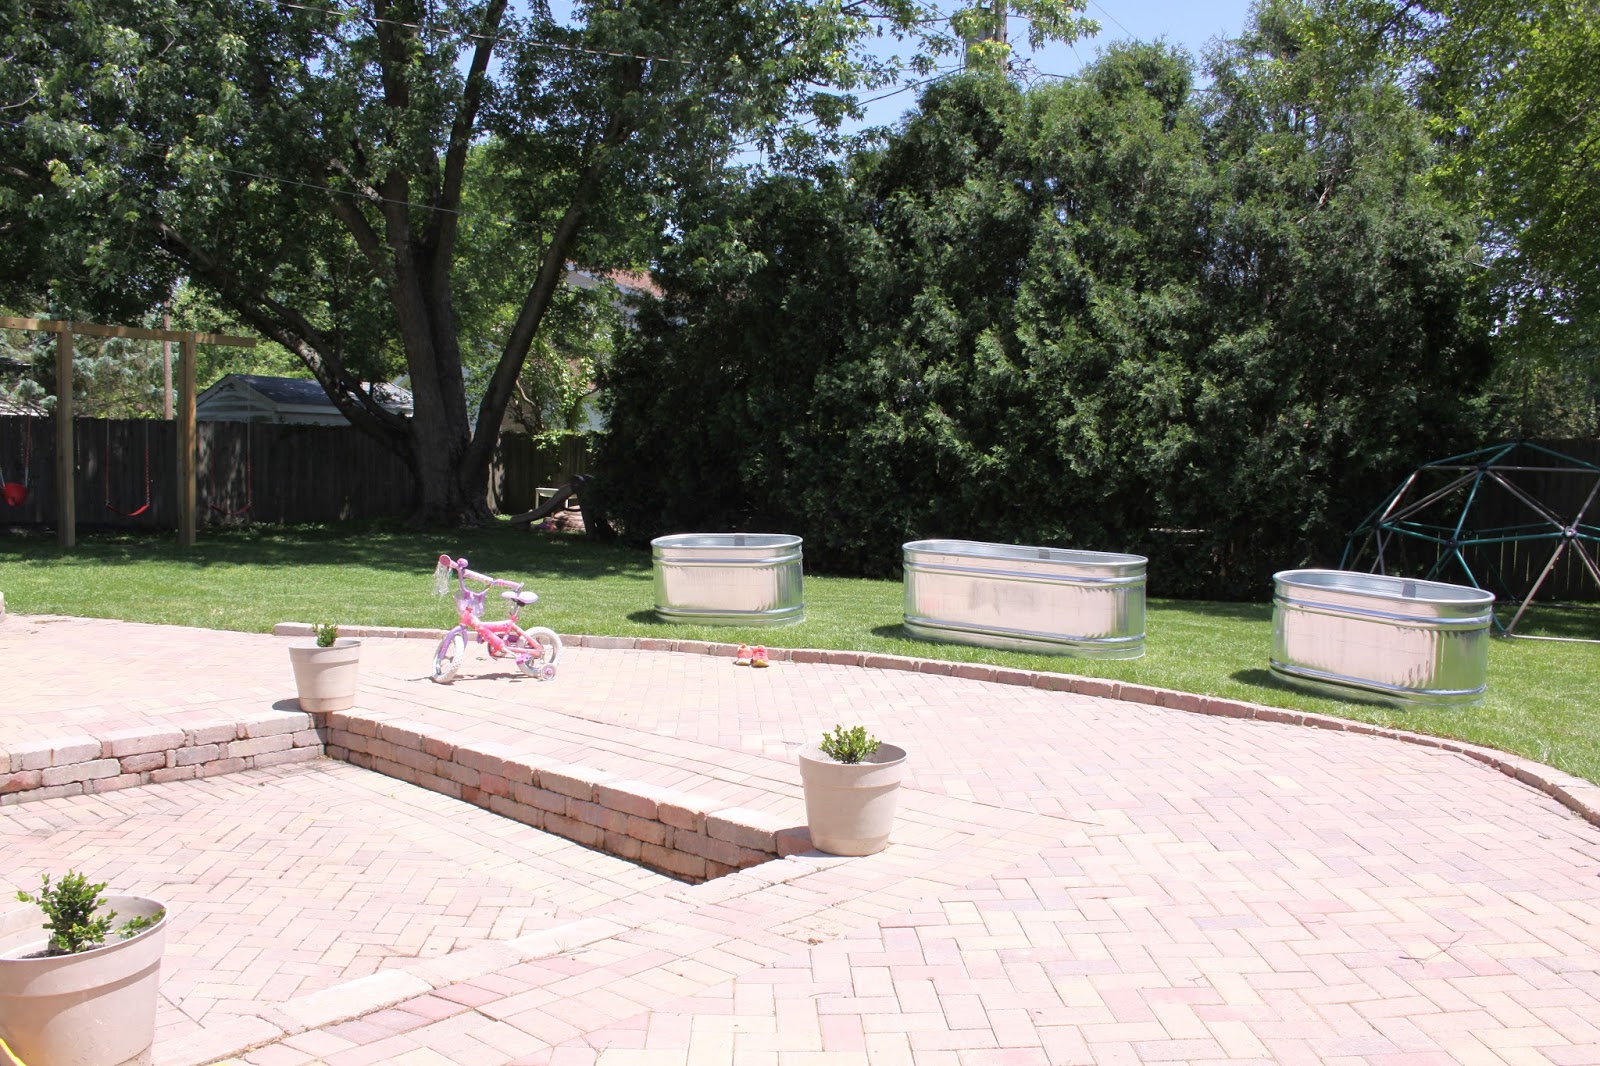
After enough Pinterest and head scratching, I decided that I would actually do best to have them just outside the patio. That area gets the most sun. And I decided it would do that designer suggestion of "trying to create rooms outside.” And it still leaves a lot of running space down the middle. (Our climber dome is moveable, so it floats around the yard.)
Once I had that idea, I knew it needed to be one big in the middle, flanked by two smaller.
I checked and our local Farm and Fleet store had 6x2x2 tanks and 4x2x2 tanks, and that became our solution.

When we got them home, I was doing my very normal move, of second guessing and over thinking my instincts. I thought maybe I should leave them silver, it was kind of stunning after all. And my fear was once you paint it, it’s painted forever -- so what if I was wrong!?!? 
So I was very nervous. I may never have made up my mind, but then the sun started shining on them and it was like staring into a mirror, aimed at the sun. And I thought “No one will want to be near the patio like this!” (Including inside the family room window!) So that made my mind up. I would paint them.

Next Blake drilled a bunch of holes in the bottom for drainage. And then I started painting. 
I had some Rustoleum Satin Black (in a quart, not a spray paint) and thought two things, 1) That I had enough paint, and 2) that satin was where it was at.

Well, I ran out of paint. And Blake was kind enough to go get me some more, only that store didn’t have satin, it had semigloss. I didn’t answer my phone so he brought it home.

I kinda pouted and got nervous, but decided to just use it so I could finish. (I got epic sunburn by the way -- I painted them out in the sun and they were reflecting tons of extra sun on me. And for some reason I didn’t think to use Sunscreen!) I covered them all with semigloss and then stood back. For about 30 seconds I was happy. And then all of a sudden I knew it wasn’t right. But for about a day I was trying to convince myself it was good -- “They started shiny, they should stay shiny," I kept telling myself. But it was just getting under my skin... like a pebble in your shoe on a hike. It had to be fixed before I lost my mind.
I did all sorts of googling of paint sheen options trying to see what to do. Because I was no longer sure about satin. 
There is some kind of small crowd fixation on painting cars flat black with spray paint cans? Who knew! But that really helped me see what I wanted.  So I bought flat black and crossed my fingers, because at this point I was VERY concerned that what I hated was the stock tanks themselves.

It was rainy, so we brought all three into the sunroom so I could fix them up and not wait on the weather.
(By the way, notice I did paint into the upper part of the inside, so that the interior would also be black)


Thankfully, as soon as it started drying my world started to feel right again. Flat black is what we need!

Here’s a picture illustrating the difference (I missed a spot and had to go back -- it’s hard to know what you’ve hit and haven’t when everything is the same color.)


So at this point I’m happy, and annoyed, because I keep yelling at myself in my head things like “How can someone paint something the same exact color three times in a row? Who does that!??”
I do!
But I am GLAD I did. That flat black is SOOO good. That semi-gloss (in this application) was SOOO bad.

And something I very much appreciate is that the flat black under-emphasises the middle ridges I wish weren’t there. Where as the semi-gloss was like florescent arrow pointing at them.

Ok, now they are painted.
.
.
.

Next frustrating thing. 
Getting them full of dirt.

I’m going to spare you (and me -- I don’t want to relive it all) the random things that tried to foil our plans of getting a lot of dirt. But the biggest one was delivery of dirt was booked up until July. And we needed to get stuff planted.

We debated ways to need less dirt, like false bottoms,pool noodles at the bottom etc. But we saw no cost savings, or any pros in our situation, so we just decided to get a LOT of dirt.

Finally Blake tracked down a u-hual pickup truck and brought it over to our Landscape Recycling Center and got two loads of dirt. And dumped them in our driveway. (To save time on the rental fee.)

Then after that he and the kids (they were so pumped! Of course their contribution was small, but they LOVED every second of it) filled wheel barrow, after wheel barrow and filled up the tanks. (While I silently fretted over the paint getting scraped off -- which did not happen! Yay!)

Awesome! We can have a garden now!
First time in adulthood, this is soo exciting.

BUT….umm…..I don’t know what I’m doing with plants. So now what?
Me being me, I REALLY want this to look pretty, not just grow some food. Especially now that I placed it front and center of the patio.

I stressed. I Pinterested. I brainstormed foods we would eat. And then I came up with a layout.
I’m pretty lucky this turned out, because I was really going on nothing but “pretty” I do not know about plants yet.

Case in point. I came home from Lowes with only seeds the day before Memorial Day, thinking I’d grow some tomatoes.
Come to find out (says the package and the internet) you have to start tomatoes before it’s warm out, inside, then transplant them.

Lydia is about to lose her mind now.  

"I seriously CANNOT keep messing this project up. I’m just never going to win this. What if I spent all this time and money getting this set up, and then the seeds don’t turn into anything, and I just have 3 black containers of dirt in my yard?!? This project was a HORRIBLE idea. I should never have tried to have a garden!!”

After trying to speak in rational sentences of discussing why I need to go get other plants that are already started with Blake, he talked me down and into trying again the next day.

So on Memorial Day I went to Walmart. I’ll tell you this -- their prices a much better than Lowes. 
Lowes packets of seeds all run around $2.50 a package (give or take -- each type has it’s own price.) At Walmart the same package was probably $1.75 ish. BUT They have some value brands that cost just $0.20 a package. 
So overall I was able to get started plants of cherry tomoatoes, regular tomatoes, 2 kinds of cucumbers and zucchini plus more seeds (And a random fern for the porch) and some marigolds for the same price as just seeds at Lowes. (I returned those.)

OK. Now I have a garden. 
I have some faith that at least the started plants will grow, even if the seeds don’t sprout.
(For some reason I was sure the would not.)
Ok now I’m also banking on getting the stuff in the middle bed to trellis up, since that’s the only way they will fit.
So I need a trellis.
You should be in no way surprised to hear this was also a very difficult thing to get right.
I kept looking online and finding something that looked good, and said was in stock in store and then find out it’s not. I handled it better than before, but I was still super bummed. FINALLY I found these trellises at Farm and Fleet. They are by far my favorite look of what I had seen AND they were on clearance for $14 each. 
So at last I’m starting to get that accomplished feeling!!


For tomato supports, I also went through the ringer on that one. Tried all sorts of things. Bought a few things and took them back because they didn’t look right. And I could not bring myself to use a regular tomato cage here. I tried it to start with and it looked pathetic in my “art garden.”

Finally I landed on sticks from my yard and twine. It looks good and right. But I’m not totally sure it’s going to cut it for support. I may need to add more, or redo it since the plants are getting so big, and I placed it when they were young. Or I’ll have to keep shopping for something else.
Like I said, I’m a newbie -- I have no clue how big these will get.

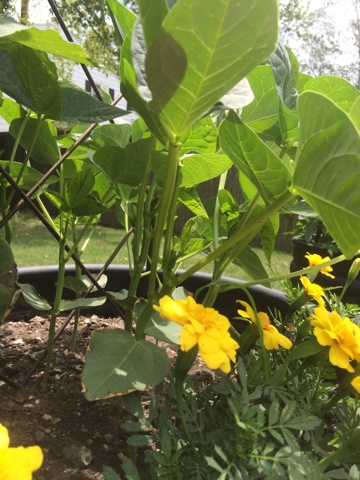
I added Marigolds to the front for a few reasons. 1) Looks 2) It’s supposed to be helpful for pollination 3) They are supposed to help keep away misquotes.

I choose yellow over orange because I’ve always liked yellow with black and I vaguely remembered vegetable flowers being yellow, so I thought it would coordinate.

I was really glad I added these because they really helped make the beds nice before the plants all grew in.

So yeah I got these planted on Memorial Day, and they have really shocked me with how fast the grow. It’s amazing!
Like I said last time  --- my delight is helping the cucumbers trellis each morning and evening. (They can change so much in a day!) I’ve gotten really good at understanding the plant and knowing when I can bend the vines and when they aren’t in that phase. And it blows my mind when it can find the next thing to grab all on it’s own. It’s such a fun past time for me.

So yeah, what else do I have out here?
In my first bed I have a cherry tomato plant on each side. 
Ruby, my middle daughter, especially loves cherry tomatoes I’m excited for these and her.
Between them is a bell pepper plant.
Through the middle I planted rainbow carrots. They should have orange carrots, white carrots and purple carrots in there. Pretty excited about that. And the girls love purple, so I’m hoping they will be excited about it. But you know, if you are gonna grow carrots, why not grow cool carrots?
The front, between the Marigolds is chives -- but those haven’t done very much -- so I’m not sure about them.


In the middle bed I have:
To the far left pickling cucumbers. Jasmine is hoping we can make our own pickles this year. I’m excited to try -- it’s another first.
Then some normal cucumbers.
Then zucchini.
Then string beans. 
So I read that zucchini would trellis but mine isn’t. I googled some more and I guess there are two kinds, and I must have gotten the mounding type. But I’ve just been shoving them into the trellis anyway and it’s doing pretty good -- so I’m calling it a victory for a newbie.

These beans are NOT trellising, so wrong kind again. Oh well.
Still looks pretty though.
And I’m letting some cucumbers grow over onto the other one to fill it in.
Honestly, now that they’ve grown to the top in some places, I’m not sure what they will do. I’ll find out! Maybe they will be able to climb back down?
In my third bed I have two regular tomato plants. I was hopping for Roma but couldn’t find those, so they are just some kind of big hybrid something.
In the center I planted two kinds of lettuce, but only this one grew -- and it took over, so I guess that’s fine.
In the back I planted flat leave parsley. I love making this one kind of “salsa” with it.
In the front I had chives again, but they are so scrawny.
Here come some tomatoes! It’s very exciting.

So my fears of this garden not working out (on repeat) were wrong.

Another lesson in mistakes are not failures, just lessons and motivation to get you where you want to be.


But yeah -- that’s my story of my seemingly endless up hill battle to get a garden that I love.
I forgot how hard it was until I started writing this. 
It really was exhausting.

But everyday since the plants have started growing has been so magical that I’ve just wiped it all away and go out and thrill over the plants.
I didn’t know I had a plant love in me. I thought I would just be tolerating them. But I’m a plant lady now. They really bring me joy and peace.
This garden is definitely a happy place.


Thursday, June 1, 2017

Extreme Spring Cleaning

You guys, I get bit by the weirdest bugs.
I'm not sure what really got me started, it might have been the combo of our across the street neighbors painting their porch (the rest of their house is brick) or seeing our friends with a similar house to ours, painting their house --- and how fantastic each is looking. It might just be my own internal intensity propelling me. 
Actually, now that I think about it... it might have just been a moment where I was trying to keep the kids busy while I did something else and gave them rags to clean with, and seeing the siding start looking actual-white again, and not being able to resist that glorious improvement.
 Whatever it was, I started washing our house.
I started over our garage door, and as you can see above, there was actual dirt build up.

I don’t know. When we bought this house, I fell in love with it’s good bones, it’s good space, and it’s great location. I had zero emotions about it’s exterior. I didn’t have positive or negative ones. I guess they leaned more towards negative because... well the house looked terrible on the whole. And I’ve never given a lot of thought to exteriors and my dream-look, and at first the black and white seemed boring to me, and the house just looked aged and tired. So in the back of my mind I just kinda figured the exterior, like everything inside, needed a makeover. I even have a photoshopped picture I did before moving of the color I was thinking it would need to be. (Now that I look at it, I don’t really like it. ha. Good thing I couldn’t do it. I was just bored waiting to move, and trying not to go crazy waiting.)

However, recently my interior designer instagrammers have all started posting (here and there) cool houses they see on walks, or inspirational exteriors, or their own work….all these white houses with black accents. And it make me head-tilt and think about my own house. Maybe this house has a great classic look. Maybe I don’t need to change it --- maybe it just needs a little spa day, and a little mascara. (Because let’s face it -- being a classic beauty is always desirable….BUT saving money….well that’s usually the main director of operations in my planning (you know, as long as “saving money” consults with “beauty” )….so yeah, how much money can I save by calling the house good as is….LOTS.)

So I’ve been pondering, what would count as mascara for the house? I’ve been coming up with the plans, I’ve gotten SOME done.

But what I’ve mostly been doing is the spa day(ssssssssssss) for the house, giving a never ending sponge bath. Every time Bronny has been asleep lately I’ve been outside with soapy water and a rag, wiping down the siding. 

Never did I think to myself, “You know what we should do, self? Hand wash the house!!” But here I am doing it. And I would feel like a crazy person only, the difference it’s making is astonishing. I just feel crazy-pleased with the results.

The reason I am hand washing it is because our contractor brother in law told us when we re-sided our first house, that you should not power wash siding, because it forces water behind it and causes rot and mold. Also I’m not sure I could actually get it as clean that way, there are so many cranny’s I’ve dug into with the rag.

I don’t have any good before pictures besides that one up there. Because I just did not foresee a visible shift so strong that I’d want before and after photos. So this may be a really lack luster blog post. But I had to do it, because in real life this really makes a major change (maybe not really an understandable change -- I doubt anyone is like “wow their house is cleaner” But I do think people will think “Wow their house is looking so well kempt these days.” But maybe not know why.) Anyway,  I am riding high on this random change in my house.

The other day I had the chance to just really scrub down the entire front porch. It was encrusted with cobwebs and dirt and it just looked really old and worn out. I was shocked to find that when I scrubbed down the porch roof, a lot of what I thought was peeling paint, was just the cobwebs’ dirty effects. The porch could still stand a repaint, but it suddenly looks awesome, and no where near as worn out and mildly haunted. It now looks like a really happy house. I keep thinking it almost looks like a new house. (That’s my motherly bias talking. It’s still a 1960’s looking house -- but it’s a fresh and homey and happy 1960’s house that’s loved and cared for.)
I mean look at the door frame and window frame -- they glow with clean bright whiteness.
I keep just popping out onto the porch and thinking “I cannot believe a simple cleaning was THIS BIG OF A DEAL!!!"
Also look at my cute fern I found on clearance for $7. That fern adds the best level of “cottage” and  "Anne-of-Green-Gables-ness” to the house. That’s a new summer must (as long I prove able to keep it alive anyway.)


As I’ve been doing this, I keep thinking: “You know this will get dirty AGAIN right?!?!” And I tell myself, “Yep! But this is worth it. Besides this has got to be at LEAST 8-10 years of dirt on here, based on what we know of the ownership. So it won’t get as dirty again for a while. I’m so impressed with this change I HAVE to keep going.”

It’s delightful.


Ok….I’ll stop now with the “I washed my house” crazytown talk. (But I might have more to come later because I’m NOT done washing. This is a ridiculously involved task I have taken on.)

We’ve been doing SO MUCH to our backyard (including washing the back of the house. ha!!) And I want to show you -- but I really want to hold out for a good big reveal post when it’s more done.
But so, one of the projects was raised garden beds, and we bought a lot of dirt for that project and turned out to have leftovers.

Blake had been talking about a project for a while now -- he’s been wanting to address a low spot in our front yard where water collects. So since we had the dirt now, he went for it. It wasn’t on the immediate plan list, but life moved it up the Que..

I don’t have pictures of this, but he dug a trench and laid down a drain pipe from the front gutter, to a pop up drain near the side walk.

Then he added a small retaining wall of bricks which match our patio and tiny drive way add-on area. And then filled it all with our extra dirt. (All three kids where ALL OVER helping filling the wheel barrow. It was quite adorable and somewhat hilarious. But man, little Bronny has been INTENT on doing helper-stuff since he could walk, there was no stopping him and his tiny sandbox shovel. And the girls where right there too.) And now we are watering the grass seed.

Blake and I are both like “WOW! That added SO MUCH. It’s one of those bigger than expected pay offs again.
Maybe not in these photos, I don’t know. But in person it’s so “professionally landscaped looking."

It looks awesome from our dining room table.
Feeling fancy with our clean porch views and our landscaped-selves.

So yeah….I was telling Blake, I think we are at the point now, where we’ve put so much into the house that every little thing we do now looks impressive. And that’s really nice. Because when we bought the house, we were just pouring every ounce of energy in and the difference was not always apparent yet. Some of it just was non-visually impressive, but needed. And some of it was a visual change, but the rest looked so bad it didn’t make sense yet. But we are finally to the “ooo” stage, where each thing does something notably good.

So for now I’m just detail, detail, detail, detail. Each one adds up to something over time. Like painting the (never used by us…but maybe it should be?) rusted out flag holder white. These little things really just take the age off.

I feel like the house is one of those scruffy strays you find (like in a movie or something, because this has never happened to me) and you think this dog is a poor kinda gangly mut, but then you wash it and love it and it’s this pure bread beauty who’s so sweet and wonderful.

I’m really loving this process, and stepping back and seeing the house shine.


As I was waiting for the photos to upload, I scrolled instagram and found this black and white house. Just like I said -- all my instagrammers feeding my mind with good beautiful things. 
Pretty right? See -- classic. 
Sometimes I toy with painting our brick white. BUT only the SMALLEST of toying….because that’s like a HUGE decision. I’m not ready to decide something that big.
Does my porch roof ever want to go black? Hmmm? Not sure, but I LOVE it here.
(Welcome to my endless mental testing of ideas. It never stops in here.)


Anyway. That’s all for today.

I’m so excited to show you our back yard stuff. But I gotta finish it first….back to the grind guys.

Monday, August 29, 2016

Patio Progress

So funny story… I had this whole personal pep talk, soul searching, deep digging internal event... and decieded I was ready to actually use my real camera and give you real photos (not iphone photos) of things. So I got the camera out and took nice photos of the leather pillows I sewed for my living room. And then I went to upload them and discovered I have misplaced my camera’s battery charger…as the battery died.
Sheesh.
Life, I tell ya.

Sooooo….

Until I find that….

iPhone to the rescue.

Let me show you our patio progress! It’s turning out rather mind blowingly good.

I had an imaginary vision for it -- but I couldn’t see it. Now that it’s physically appearing before my eyes I’m shocked by it’s wow factor. Blake is doing amazing!!


So, two weeks ago we had our pavers delivered. We found them at Menards and got them all during a sale. Score.


Then my parents came to town to visit and my dad helped Blake lay the retaining wall for the suken part. 
I’m not in on the manual labor business, I’m the kid wrangler. So I can’t tell ya much about it. But they told me that part required the most precision work -- it kinda determined the precision of everything else. So they spent a lot of time making sure everything was level and square.
To the left there, you can see the sump pump bucket in that circle slot in the ground. That’s going to carry rain water away from our house to keep the family room dry.


Then another day Blake and a friend built up the half circle step/platform by the sunroom doors.

In this picture Blake is racing the rain, to get the sand covered by a tarp, just to make sure stuff doesn’t get washed away.
We seem to be getting a lot of rain while this project is underway. I can’t tell if it’s extra, or if that’s normal and that we are just really noticing that because of how it effects stuff. But either way, it’s rained often in the last two weeks.
Anyway,
So yeah here’s where I brag on Blake for a bit.
Let me tell you all the awesome things he’s been doing.


He moved 7.5 tons of road-pack gravel by hand, with a shovel and a wheel barrow -- from the driveway around the side of our house to the back yard.
7.5 tons by hand!
It’s not something I ever really stopped to consider before, but I just feel like saying a single human moved a literal ton of anything sounds amazing. And he moved seven and a half of them!
He debated renting a bobcat, but we’ve rented a few other things for this project and I think he was just dedicated to saving the money this time around.
That was a lot of labor, and he did it well.

After the gravel was in place he rented a tamper, and with a friend over to help, he went around and tamped it all down. I don’t think I got any pictures of that. But the tamper is kind of the shape of an oversized vacuum cleaner, only of course it’s not vacuuming -- it’s got a flat plate there that vibrates like crazy, pressing down the ground.
That tamping process makes the gravel turn into what feels more like cement when it’s all compacted down, and will make the ground more stable and less likely to shift in the seasonal changes.

Next he laid down landscaping fabric, to keep out weeds.
And then again he went to work with the shovel and wheel barrow and moved 5 tons of sand by hand!
He said the sand felt easy after gravel!
All I have to say is wow.


So random story time. 
There was a day at this stage where there was an BIG heavy rain, for like 15 minutes. The new sump pump is in, and had been working wonderfully. But this day it had been unplugged for something. (I didn’t know that and I kinda panicked for a minute thinking it was broken. Until Blake plugged it back in.) 
But the brilliance of this patio, is the fail safe aspect of the sunken part. If the pump doesn’t go on for some reason, the water has a place to go, that isn’t our family room!!
Another brag on Blake there -- he really thought this whole thing through!
That day’s rain was the kind that guaranteed would have soaked our family room before this project. But the family room was totally fine and dry -- even with the sump not plugged in. 
(After we plugged it in, it emptied in no time.)
And cute story time-- Jasmine is into having imaginary fairies and mermaids right now... so they swim in there, and play in the “fountain” the sump pump makes. I love it.

Anyway, here Blake is laying the bricks in place for the ground.
Once again -- gold stars all around.
He told me from the get-go whatever lay out for the pavers I could come up with he would figure out how to do and make it work. And that he has! He’s rocking it out.
He’s even putting up with me coming outside after he’s laid some and being like “umm wait, we need to tweak the design.”
I’m trying not to do that much. But I’ve had to do it once in a rather annoying moment. And another time I caught it before any real work had been put into it.
I love him for letting me do that because it’s making all the difference in the world for how it’s going to look in the end. And I know it’s not fun, but he’s good to me. :)
So here’s the sunken part before the fitted corners. I was THRILLED to see this.
Entirely more fancy and amazing than I knew to expect.
After that he moved over the the raised step.

Jasmine has been over-the-moon with helping. She asks all the time when Blake’s at work when she can help next.
She’s helped shovel gravel and sand, and move bricks. And she’s a trooper, I’ll see her struggling with a large brick (and I have to reign in my mom-fear of her dropping it on her feet and let her be), but she doesn’t give up she just keeps at it until she gets it and moves it over to it’s place -- never complaining. Just plodding along. She is into it!

Here’s the step up, with the bricks that need to be trimmed down, just set in place.

A view from the sunroom’s perspective. Eventually all that sand with be pavers too.

Then this weekend, Blake’s friend brought over a special saw to cut the pavers to size.
And over the course of the afternoon they got all the sunken part fitted.

I mean...
….that is PRETTY!
 Let’s just look at it for a moment and savor it...

As far as the sump pump area is concerned we are thinking we’ll probably set a fire pit bowl over it to hide it away.

I’m currently really ruminating on how to use the sunken part.
You may remember me saying in the last part we’d do benches on the sides. But now I don’t think we will.
The depth of the sunken part turned out to be shallower than initially we’d imagined it. 
Us, not being professionals, we didn’t know about the road-pack before the guy came and dug out the area. So that raised it up some. Plus, just generally we didn’t have a super specific depth planned on, so this is the height we got. I don’t think it seems bench-y. 
I want to REALLY nail it when it comes the the furniture I put in there, because as a rule the idea of a random sunken part of your patio seems out of place. So people are going to wonder about it. But I figure if I can plan out just the right something, it won’t be so questionful, but it will look artful.
I also don’t want anything to feel like a trip and fall hazard. So I want the furniture to flow with that somehow.

So I’m thinking like crazy what it could be that we put there. It doesn’t have to be this year that it shows up. I just want to ruminate and find the right thing.


Anyway --

Time for a Family Room Window’s view flash back:

What I saw when we bought the house


What I saw for the past year.

What I see today.

That’s some good looking change right there!
It’s just gonna keep getting better too!
I’m kinda in shock -- in the best kind of way.


Blake, you are awesome!
I love you so much! (With or without a Patio, I love you so much!)


Link Within

Related Posts Plugin for WordPress, Blogger...