
Last week my mom came to hang out with us, which gave me time to get our kitchen in shape. (Thank you again, Mom!!)
I hadn’t really given our kitchen a second thought for a while now because it wasn’t awful. The wallpaper in there was a neutral tone. And after we got it taken down the walls underneath were mostly unmarred cream color. So I just kinda left it without thinking I’d get to it for a long time.
But it felt like a perfect sized project to fit well into the amount of time I’d have to work while my mom was here, so I went for it. And WOW am I glad I did!
Here’s a reminder of what it looked like the day we bought our house:


Tiny tulips all around. And you can’t see it from here, but that clock expertly matched the wallpaper to the tee! I don’t even know how they did that.
A VERY old dishwasher. And tile that appears to have black grout.
We bought a new Refrigerator and Dishwasher with the money we saved by DIYing our hardwood floor refinishing upstairs. But we left the stove because I’d like to get a gas stove, but first we need to pipe gas back there.
So like I said it wasn’t feeling that bad in there. But once I got it done it feels way better than I ever thought the space could feel.
Our long term goal is to take out that wall next to the fridge, with the window hole in it, and make all that one room. Add some more counter top. Have space for an island. But that’s later.
So for now. Here’s our breath of fresh air:
(Oh and be warned: I only made it “good day around here clean.” Not "blogger looking to be featured somewhere clean.” I knew you wouldn’t care.)
After:

(Still need to paint the outlet covers white!)


Just after painting the ceiling, the room felt like a different place entirely. The brightness level in there is a million times higher than it had been. In the BEST way.

Then brightening up the trim (to my Fav Valspar's Swiss Coffee, Ceiling as well.) That really made a VERY big difference.
I am in some very deep real pondering of the use of not-white in the 80’s and why, oh why, did they do that? White is SO FABULOUS! I can’t wrap my head around it.

As for the walls. They were interesting.
First I had to mud and sand some issues.

And I also tried really hard to wash the walls down to get the wallpaper stickiness off. And as I would do it, my rag would get lots of goo on it, but the walls ALWAYS felt like wet envelopes no matter what I did. I talked to my mom and she said just roll the paint on.
So I did.
But it was WERID.
I would get my roller sopping wet and put it on really thick and it would only stick to some of the wall. And it globbed up. And if I tried to roll again while wet it would take almost ALL the paint off in a sticky ball.

When I got up in the morning all was well. So I just did that same heavy rolling over all the walls and let them dry. After one coat, it was smooth sailing, like painting any other wall. But behind the fridge was the worst so that wall is very lumpy. (Good thing you can’t see it.)
Then I started cleaning the grout.
You may have seen on instagram I did this in our foyer. It worked so well I knew I had to try it in here -- the floor was DIRTY! I wasn’t sure this grout could get clean. I thought I’d be turning to grout renew a paint like stuff. But it did come clean!

A paste of bleach, and baking soda. Let it sit for a while. And then with this nasty of grout I had to really scrub it out with a tooth brush. (In the foyer I really didn’t scrub, it just wiped away. But it wasn’t black out there.) I went through 3 toothbrushes in here -- the bristles disintegrated!
But look at that! AMAZING!! So worth the backache I had all the next couple days. (I mean, I had been painting too, so…)
But in person, this makes the room feel like a totally different place again. Just the ceiling and floor brightness of the space now is a major factor in how great this space feels in real life. It’s so refreshing. It just feels clean, and like a real home, instead of a crazy place we live.

Ok so now, at this point, we are here, in the progress. Feeling good, but well, that backsplash is annoying. I picked the wall color because it did not fight with the back splash, and it didn’t make it look pink. But let’s face it, it’s just not singing with the space.

A friend had mentioned when we first moved here how people paint title.
The only tile I had ever seen in person that was painted was very poorly done in one of the houses we looked at (and hated) while we were house shopping. It looked really fake, just like paint, and I couldn’t imagine it being better than peach tile.
BUT after getting the space painted, the tile was just drawing all my attention, so I said, “Meh. What the heck, it’s not gonna look worse. Eventually this tile’s going in the garbage when we take that wall out. So let’s do this.”
I read a few more blogger’s posts where they did this and then bit the bullet.


After I got that done I did a really light coat of the primer to keep it from looking globby. Waited the time it prescribed before doing another coat. (I think 2 hours.) Then I did another really light coat. But I didn’t go back into the grout with a brush again with the primer.
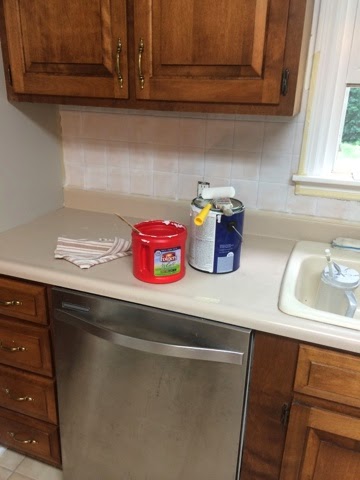

Before:

After:

This is REALLY close up. Even just from standing in front of the counter you would barely notice this, but up close you can see the foam roller’s mark. It’s no longer super glossy smooth, but it’s not terrible. And the grout lines are still deep. And they even have a bit of color left under them which I like because grout and tile are never exactly the same color -- which was one issue I was really nervous about with paint -- how monotone it’d be. So it’s not as bad as I’d thought.
I’m 100% glad I did it. Because the room is SO much more modern looking now. So clean and fresh.
And I really like the way it made the countertops lean more towards grey now than peachy beige like it had seemed before.
So far the paint is wearing great, I’ve wiped stuff off behind the sink with total ease.
Above the stove was interesting. The tile stopped abruptly because it used to house a microwave there (found it in a closet) (We already got rid of it, it was old and black and huge -- we didn’t want it.) And you can see there is a outlet towards the left they wallpapered over to hide. I didn’t want to bother with something hard, so I painted the wallpaper wall color and had Blake cut me a piece of trim to top the tile with.


Now I just have to get over the fact that the oven is almondy-white. Eeeeeeh.
And last but not least. I’ve never liked the hardware in here.
I know, I know, some of you are like “But you told us Brass is Back.”
It is. But I don’t like THESE handles.
I bought new handles (that actually are brass, and I love them more every time I think of them.) But they have a different hole spacing. So I have to save those for down the road when we do a bigger makeover and use paint on the cabinets. (Likely once the wall is moved. We will see.)
I’ve given it a lot of thought, and I do like the wood tone, but ultimately I’m happiest in a white kitchen. (Or almost white, we will see.) PLUS a big thing that bother's me is the fact that the holes for the hardware are not straight on many of the doors, so if I want to fill them in, a person can’t do that well unless you paint over the filled in holes -- you can’t really get them to look like untouched wood again.
SHEESH, like you care…ANYWAY….the hardware for now was bugging me. SO I took them off,

And spray painted oil rubbed bronze on them.
While they dried I rubbed the cabinets down with Old English Lemon oil to bring back some luster. That really did some good!
After painting, it’s not like the handles’ shape got better. But I am surprised at how much more I do like them now. So yay for a quick fix. (Quick being relative, since unscrewing all 26 of those with weird different unmatching screws was kinda time intensive.)
So after all that my kitchen feel SO MUCH MORE INCREDIBLY BETTER than it had. I really didn’t think it’d feel good to be in until we took the wall out. But I’m very happy --- it’s feeling so nice right now. I’m not in a hurry to take the wall out because I’m ready for a house break -- to just live in a house not torn apart. But someday we do plan to change it up.
BUT just to recap:
Before:

After:
Before:
After:
Great job! Love the way it turned out. I did a thorough grout scrub when we moved into our place a year ago, and it made such a huge difference. It felt like a brand new place. I couldn't even believe the grout was supposed to be white.
ReplyDeleteThe Joni Journey
Did you consider painting the cabinets?
ReplyDeleteYes! It’s on the to-do list. (This house has a LONG, LONG, LONG to-do list.) Honestly, I really like this tone of wood on the cabinets, so it may be a good amount of time before I get around to it (sine the don’t bother me.) But personally I’m happiest in a white kitchen -- so long term we want white (or white-ish) cabinets. The big plan is that someday the whole kitchen will get a reno -- taking out that wall between the rooms, and new cabinets and counters and floors. So the interesting part will be to see which comes first, painting the cabinets, or just letting time go by before they just get the boot. :)
DeleteAmazing job with that 'for-now' makeover! I love how the grout was transformed from the dirty looking black to the clear and clean look of it now. The wooden cupboards are gorgeous too. Anyways, I can totally relate with having a long list of to dos. Here's to hoping that you can start on them, ASAP! Hahaha! Thanks for sharing!
ReplyDeleteNathan Riley @ Steemer