
Making your own nursing pads can be a great money saver.
With disposable pads costing about $10 for 60 pads (which is only 30 sets). That can add up quite a bit, especially when you consider how often you will be changing them.
 Buying reusable pads can help to save a few bucks, and some landfill space, but they are a big initial investment because they are often rather expensive for only a few sets.
So why not sew up as many as you like, for not-so-much money?
Besides, then they can be made out of whatever you like --- custom for you.
And the ability to contour them (most reusable pads sold are not contoured)
really helps in keeping them discreet.
Let me show you how.
After some investigating, I decided to make my nursing pads out of flannel and synthetic fleece {polar fleece}. And I loved that combination. The flannel absorbs great and the fleece on the outside kind of repels so it helps to keep the leaks in while remaining breathable.
But since you are in control of your nursing pads, you can choose whatever material suits you. (I've seen sets at an environmentally green specialty store that were made from hemp --- maybe that's your taste.)
But for this tutorial I'll stick to saying flannel and fleece.
For myself I used all nude/flesh-tone material.
I was worried about them showing through clothing.
But in hindsight I can see that is a pretty minimal concern
since they are inside both your bra and your shirt,
so it's not too likely they would show through all that .
And in the bleary-eyed beginning days of motherhood,
it might be nice to have something pretty
to brighten up the fact that you are now a leaky faucet.
Then again you can have the best of both worlds
by using the pretty on the inside and flesh tone fleece on the out side.
You can do whatever you want!
Isn't it fun to get to design?
Money Saving Tips:
Watch for sales at your fabric store,
flannel and fleece tend to go on sale frequently, keep your eye out.
While you are there check the remnant bin, you can often find fleece remnants that are discounted, and at most stores if you buy a remnant while there is a sale on that type of material you get both discounts!
Want to be even thriftier?
You can cut up old flannel sheets or fleece blankets you already have, or find them at a thrift store. You can even cut up old clothing made from this stuff. What about that over abundance of receiving blankets? Yep.
Think outside the box and these nursing pads could be almost free!
Ok so now
How To Make Your Contoured Nursing Pads:
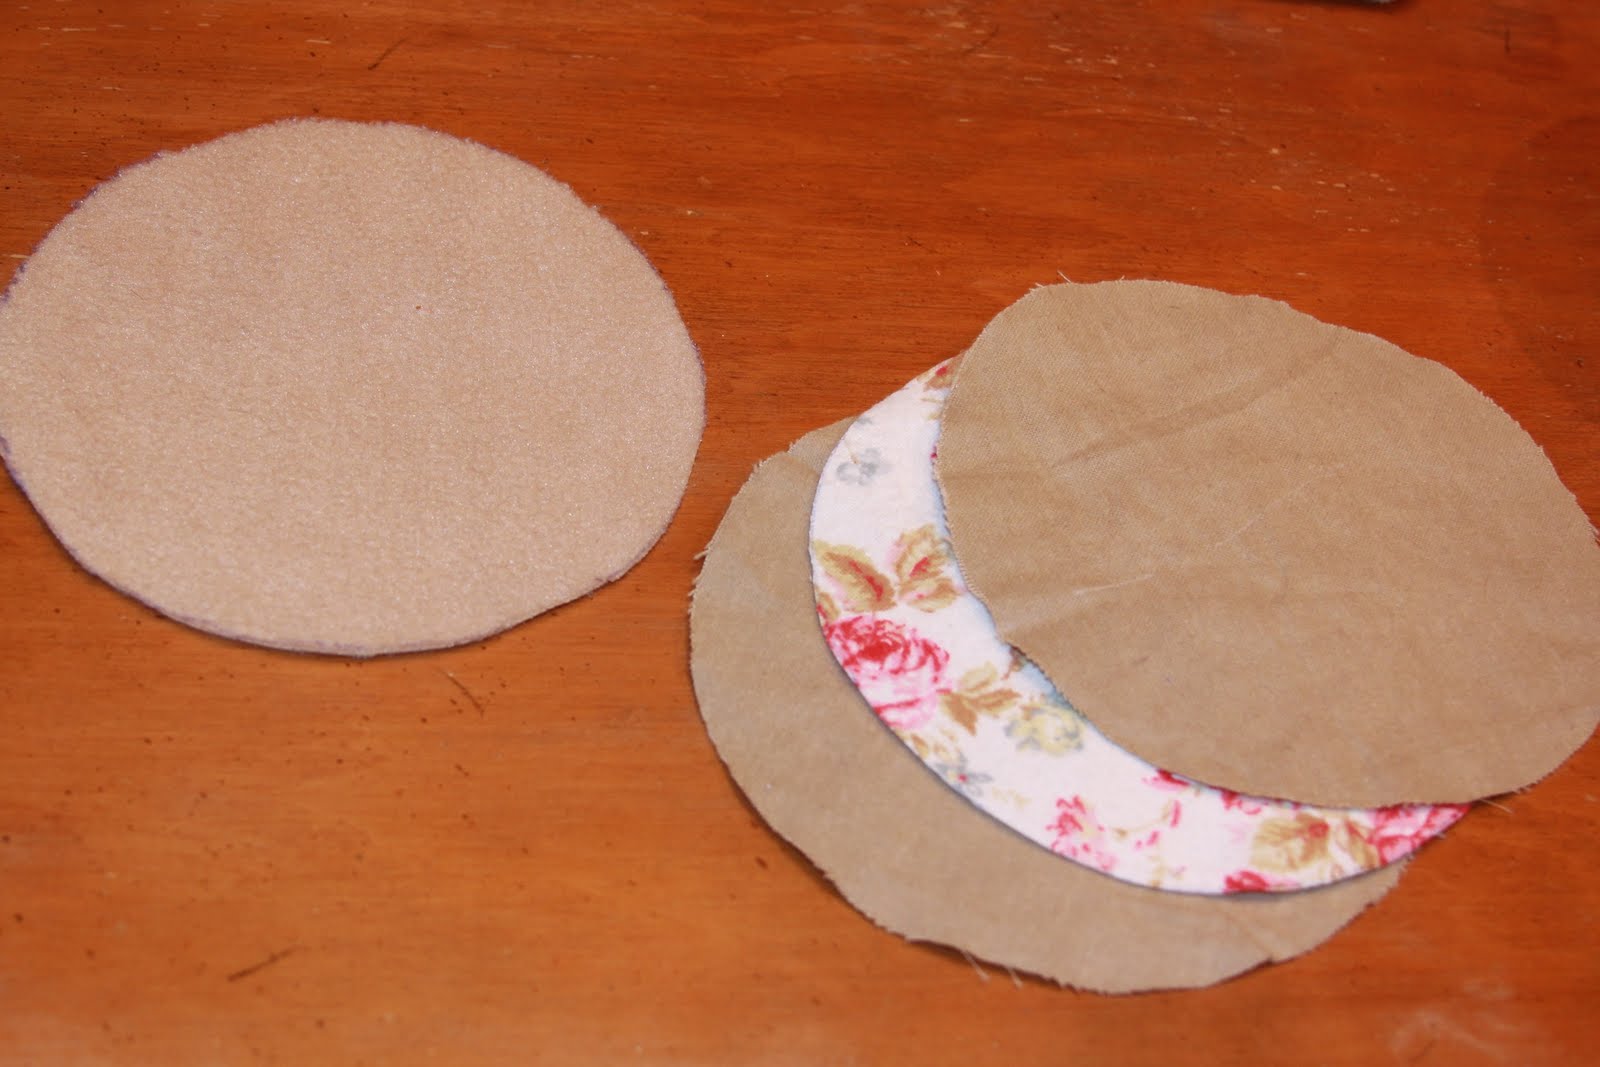
You need to trace and cut out circles -- 3 flannel and 1 fleece per pad.
I used my cereal bowls (which are just over 6" in diameter) as a guide.
But just for you...
I have drawn up a perfect pattern that you can download at the end of this post. Yay!


How many pads do you want?
Well that's up to you.
I went hog wild when I was pregnant and made a TON
and then found out I didn't need quite that many so a shared with a friend.
After that, as a gift, I have given out 24 pads (12 sets),
which seems to mean doing laundry about twice a week.
But these pads are easy to throw in with anything, so you can be washing a couple in every load and have a steady flow of clean ones.
Once you have cut out allllllll the circles you decided that you need,
stack them into pad piles: 3 flannel, 1 fleece.
Now cut out a "piece of pizza" from each pad, cutting through all the layers at once ---
this is how we will contour them.

You can adjust the size of this slice to create more or less shaping, but the size I have included in the pattern below gives you the same amount of contour that disposables have.
(Which makes me think it's pretty much universally-appropriate.)

Now move over to your sewing machine.
Set it to the widest stitch, and a very very short length.
The goal is to completely close the gap we created with the pizza slice.

Start at the center of the pad (I like starting with the flannel side up), pull the two edges together, and do not overlap.

Create a very tight seam that reaches both sides of the cut, holding it together.
(I'm using white thread so you can see it easily, when you make your own you can choose to match or contrast your fabric.)

Ok so you tried really hard to get both sides to connect to each other, but when you flip it over, it's not all sewed together!
It's ok.
That's just kinda what happens.

Flip it so the fleece side is up
and sew up and down, to each side of the original seam.

Looking good!

Now I go through and pull at each layer to make sure it got sewn in.
Uh oh, one didn't quite make it all the way into the seam...
That's okay.

Sew a bit more there.
And now, it's all sealed up!

That is kinda a lot of sewing, but it goes fast after you do a pad or two and get the feel.
And my perfectionistic-leaning self really values this contouring seam because without it, pads can kinda make you look like you have flying saucer boobs.

Now, I like to cut away anything that sticks out too far around the edge just so I can see what I'm doing as I sew around the outside, making sure I catch all the layers.

And I use my serger to finish the edge.
But if you only have a sewing machine, you can use the zig-zag stitch
set to a wide stitch with a shortish-medium length --- something to hold it all together nicely.

I found it kinda tricky to get the hang of serging a circle the first few pads I tried.
It's kind of a pushing-away-from-you-with-your-right-hand and pulling-towards-you-and-around-the-pad-with-your-left-hand motion.
You'll get it.

Make sure you secure the serged seam so that it doesn't unravel.
I just pulled on the individual strings of the tail until it tightened up and then tied a knot.
There may be a better way but that worked just fine for me.
What a nice finished pad!

Then I like to give them all a wash and dry just to see how they will hold up. Check to see if any of them need any attention and sew closed any spots that thought they could escape.
(Added bonus: washing them a couple times helps them to be ready to absorb!)
And there you have it. Seriously great nursing pads.

I loved mine so much!
The few times that I used disposables, I was longing for my homemade nursing pads. I just thought that they were more comfortable and easier to work with.
(But as a side note, I found it is nice to have a box of disposables around for random reasons, say a weekend trip, so you don't need to worry about laundry or if you need to wear something very fancy, like a bridesmaid dress, since disposables are more watertight, which means less to worry about in front of an audience!)
They look best, and absorb the best, if you wear the seam side on top, facing up --- fleece on the outside of course.
How to care for your nursing pads:
These are easy to wash and dry on any setting. You should take care to wash them with detergent, not with natural soap or fabric softeners because those cause buildup and may cause your pads to stop absorbing, which would defeat the whole purpose!
Okay, go ahead and download the nursing pad pattern here, print it out, and get sewing!!
Pin It
I wish I had done this before I bought so many expensive reusable pads that did not absorb well and then again bought so many that were not quite contoured even though they were advertised as such! Great blog posts Lydia :o)
ReplyDeleteI'm going to be making a bunch of these! I'm 26 weeks pregnant & have been leaking since like 19 weeks! Thanks for the tutorial & pattern! I have a bunch of family pregnant as well! I will give as gifts!
ReplyDeleteKarin Marie
blondechic1413@yahoo.com
babycakesandpeanut.blogspot.com
This is absolutely genius. I hate payin $15-20 a month for disposable nursing pads. Why have I not looked into this before? Thank you so so so much for sharing!
ReplyDeleteI was thinking it might make it easyer if you did a quick straight stich down the side of each "pizza cut" conecting all the layers together before you do the zig zag, this way the layers wont move and you can get them all in one or two goes.
ReplyDeleteThat is a great idea!
DeleteI am very sad! I have tried downloading this pattern that you have available but in order to download it you have to be a premium member (paid member) to download the pattern...
ReplyDeleteDoes anyone else know another way to get the pattern?
Sorry about that! The problem should be corrected. I have it hosted on Google Docs now as a PDF. Let me know if anyone else has any issues.
DeleteI have what may be a silly question. Does the fleece/felt combo keep in extra heat? Is there a more breathable yet absorbent fabric you would recommend?
ReplyDeleteI was really worried about the heat issue too, especially since I had summer babies. They sound really hot, but I honestly don't even notice them in there -- actually I find them more breathable/heat-comfortable than disposables.
DeleteI made a couple sets without the fleece, and just used flannel (not felt -- I'm assuming that was a typo, but want to point, out just in case, felt would not be absorbent) and those leaked through much quicker, making them not really worth it.
I haven't personally tried any other fabrics, so I can't really suggest any to you. But you might want to just try finding some fleece and flannel fabric remnants (they are cheap and small) at the fabric store to give it a test run, and then just wear them around for a few days to see if they make you hot, before you make more.
this is the first one I've seen using the fleece what is the reson for it instead of more flannel? Thanks
ReplyDeleteYou might be able to use more flannel. I made some with the 3 layers of flannel and no fleece BUT they leaked very easily. The Fleece is water replant, so it kinda keeps the leaks held in better. I mean eventually everything leaks once over saturated. But The fleece extends the "leak-time" out some more.
DeleteBut the cool thing about making something yourself is being able to use whatever you like!
Has anyone ever tried to use the pads that come in wireless bras? I have a bunch of them and was wondering if they would work with the other layers. As a plus, reusable nursing pads work great as coasters when your done nursing.
DeleteHow do I sew them without the outside edge stretching?
ReplyDeleteHi,
ReplyDeleteWhat a great idea, I just love it! I tried to download the pattern but it seems you have to create a membership first? Is there anywhere else where you can download it?
Best regards
Sandra, Sweden
Nice idea to cut out the wedge and allow for shaping. One thing I plan to do is trace the circle and wedge onto the top layer of fabric, and then sew the circle and wedge it before cutting it out. By sewing the wedge shape and then cutting out the wedge, you will not have any problem catching all the layers when you zig zag the two edges together, because all the layers will be securely straight-stitched together. Also, this should make serging the edges easier as the 4 layers will not shift at all.
ReplyDelete-Ann
Oh that IS a good idea! SO SMART!
DeleteI have used these for years during the winter because my breast get so cold. I made mine out of flannel for the outside , fleece on the inside and a thin thermal linning in between the flannel and fleece.. They are very warm..
ReplyDeleteAlso if you have a bra you love but find it too hot in warm months you can make these out of cotton and place into your bra - this takes the heat away from your skin. You can also line your panties in the same way when they are too hot to wear in warm months.
Hey, just saw your blog. wanted to ask, have you ever made a bra by yourself. I am looking at a pattern to make a bra of large size. Would you be able to help.
ReplyDeleteCheers
Priyanka
Hi Priyanka, I’ve never made a bra from scratch, but I have altered ready made ones to create bras with a large cup size and a small band size. Here’s my post on that, maybe it will be what you need: http://walkingwithdancers.blogspot.com/2011/04/how-to-alter-bra.html
DeleteThanks Lydia, I went thru your post, but I guess my hunt is not over yet. The size i am looking at is not available in my region. Will continue search :-)
ReplyDeleteThank you for providing this wonderful pattern and tutorial. I made a set for my DIL to try (along with a plain round type). My DIL loved your design so now I'm making another 10 sets.
ReplyDeleteNursing pads are absorbent pads that are used to keep breast milk from leaking or seeping through a woman's bra or shirt. Nursing pads are similar to sanitary towels for your breasts.
ReplyDeleteThanks for you nice post, I am interested to your blog.
ReplyDeleteI am so glad you found the tutorial helpful.
breastfeeding tutorial
Thank you for sharing such wonderful information! Don't forget to always keep a healthy life!
ReplyDeleteThank you so much for this! I am on a budget and with a baby coming, I would rather spend the money on their needs.
ReplyDeleteHey Guys, I read your post It was really amazing for me. I am very glad for this post. I will be happy if you post here more
ReplyDeleteThanks for share this post, if you are looking online incontinence pads then now visit given website links here and we help you to pick the coverage you need for the self belief to live your life as you ought to, everyday. It's handy too. Novamed pads delivers to your own home, discreetly packaged.Never be without once more. We'll assist you installation repeat orders to ensure you're continually protected male incontinence pads, and within the most comfortable manner possible. No limits, no concerns.
ReplyDeleteRead More:- Adult Diapers
Get incontinence pads for men on Novamed online store. Novamed is the top online store for the incontinence pads.
ReplyDeleteFind the perfect canvas drop cloths for your next project at wi-supply.com. We carry a wide variety of canvas drop cloths in both large and small sizes to fit any need.
ReplyDeleteHow much fleece and flannel fabric will be needed to make 24 of these?
ReplyDeleteThese homemade contoured nursing breast pads seem like a game-changer for new moms. Saving money and reducing waste while ensuring comfort during breastfeeding is a win-win! Thanks for sharing this insightful guide.
ReplyDeleteTruly amazing post you shared thanks for Chucks Disposable Pads.
ReplyDelete